Screen and buttons
Everything on the front of the device: what each control is, what the buttons do, and what the screen shows you.
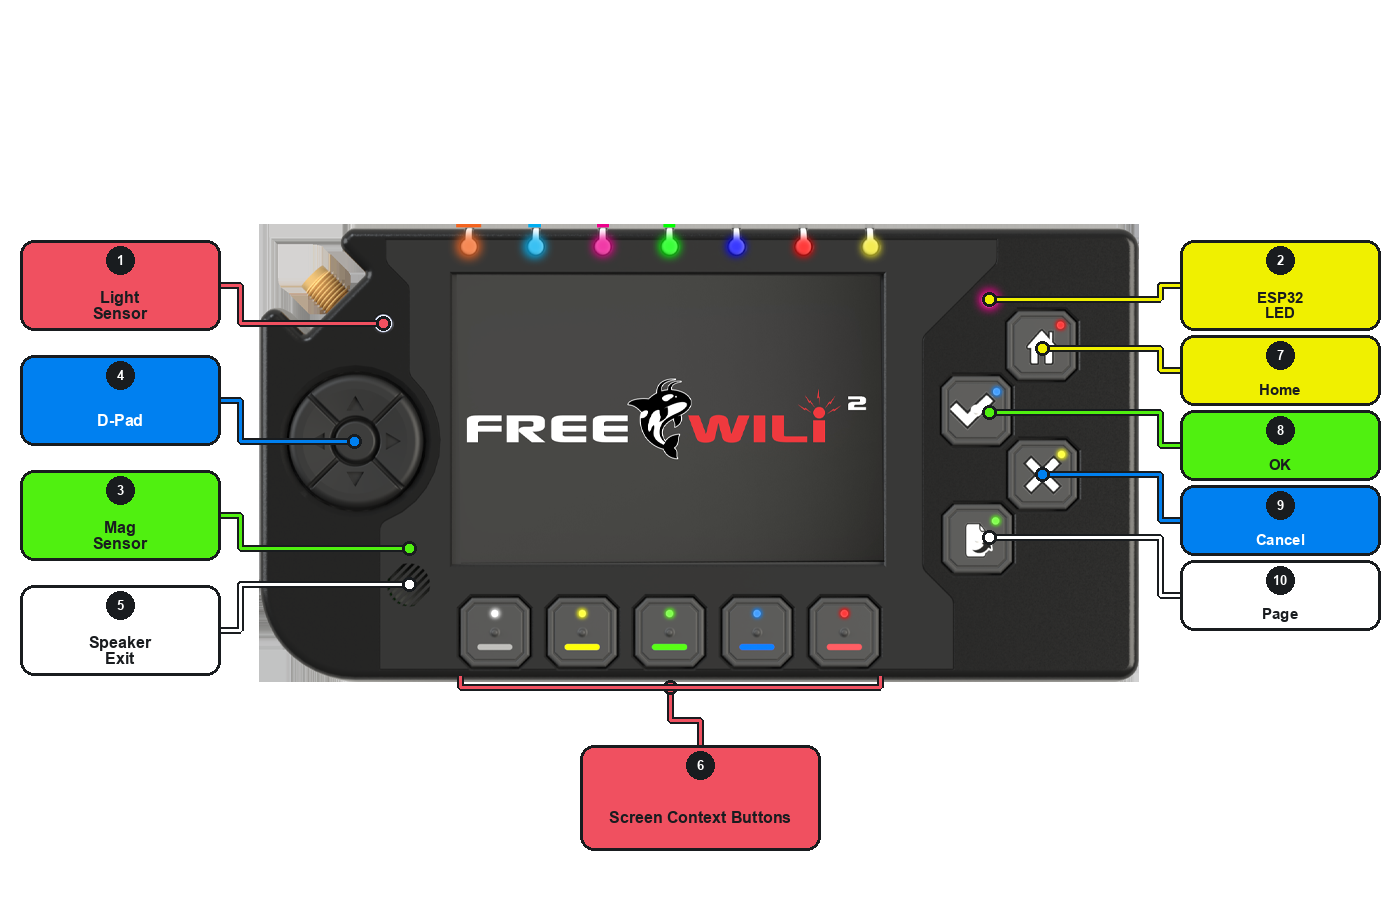
| # | Control | What it is |
|---|---|---|
| 1 | Light sensor | Measures ambient light. Its reading appears on the Sensors panel, and Power Management can use covering or uncovering it as a wake trigger. |
| 2 | ESP32 LED | An indicator tied to the ESP32-C5 wireless co-processor, separate from the seven along the top edge. |
| 3 | Magnetic sensor | The magnetometer. X, Y and Z field strength in microtesla show on the Sensors panel's Field page, which is also where its calibration is reset. |
| 4 | D-pad | Up, Down, Left, Right and Center. What each does is in the button map below. |
| 5 | Speaker exit | The opening the built-in speaker sounds through. |
| 6 | Screen context buttons | The five buttons under the screen — gray, yellow, green, blue and red, left to right. Each panel decides what its five mean, and labels them on screen. |
| 7 | Home | Returns to the main menu from anywhere. |
| 8 | Ok | Opens or confirms. |
| 9 | Cancel | Backs out one level — or opens that screen's help, where it has one. |
| 10 | Page | Moves to another screen within the same panel. |
The status LEDs
Seven full-colour LEDs run along the top edge, above the screen. They are the board's own indicators rather than anything a panel owns, and the Light Show panel drives all seven — that page also covers the external addressable strips you can attach to the GPIO header.
Button map
| Button | Action |
|---|---|
| Up / Down | Move through the current list |
| Left / Right | Change the selected value (in a control that has one) |
| Center | Open / activate whatever's selected. On the main menu, this is the same action as Ok. |
| Ok | On the main menu, the same as Center — opens whatever's highlighted. Inside a panel, what Ok does is up to that screen: some use it to confirm an edit or leave a sub-panel (the Analog IO waveform screen leaves that way), others don't use it at all. Check the screen's own button labels if you're not sure. |
| Cancel | Back out one level — or, on a screen that has a help page, opens that help instead (see Built-in help below) |
| Home | Return to the main menu |
| Page | Switch to another screen within the same panel, where that panel has more than one — the Logic Analyzer view opens this way from GPIO, UART, SPI, I2C and MDIO, and the About screens step through each other with it |
| Gray / Yellow / Green / Blue / Red | The five context buttons under the screen; each panel assigns its own meaning to them (for example, on the Analog IO waveform screen, Green starts the waveform and Red stops it) |
See Quick start for what each of these looks like on the device.
Long-press actions
Beyond the short-press, per-panel meanings above, three of the five context buttons have a long-press shortcut in the GUI that is the same everywhere rather than panel-specific. All three only fire from the main screen: long-pressing gray switches to an audio-only mode, long-pressing yellow enters a setup mode, and long-pressing blue enters the display processor's own bootloader (see Recovery mode) — that last one also needs USB connected, with the charger actively charging or finished charging.
Red has no GUI long-press action. It does two other things, depending on when you hold it, and they are easy to conflate:
- Held while the device is already running for 6 seconds, red starts a safe 10-second shutdown, after which the device drops into a 60 µA sleep — "ship mode". This is the PIC's own button poll, acting independently of the GUI or the display processor, and it is how you power the device down day to day. Gray, held for 3 seconds, powers it back on.
- Held at power-up, red instead forces the main processor into its recovery bootloader — a hardware path, unrelated to sleep. See Recovery mode.
The panel list
The main menu is a single scrolling list of panels — panels are the
screens the firmware itself draws and hands the buttons and touchscreen to.
That's different from an app, a .uf2 file the SD-card bootloader loads
and runs on its own — see Running apps.
Everything in the list below, including the folders, is a panel (or a folder
of panels), even where the name says otherwise.
A handful of panels sit at the top, outside any folder — Command Panel, Scripts, Wili Blocks, App Data, Editor — described in The top-level panels below. The rest are grouped into folders you open and close from the list itself:
- IO — GPIO, Analog IO, I2C, SPI, UART, MDIO, CAN (FD), GPS (not yet implemented), USB Sim (not yet implemented)
- Wireless — IR, RFID (not yet implemented), LORA (not yet implemented), SubGHz, Wifi, BT
- Wi-Li-nux — Terminal
- Apps — Skelltris, Wili8, Doom: three real apps meant to launch from the SD card, but the launch wiring behind them isn't finished yet — today all three instead open the Wi-Li-nux Terminal panel. See Running apps for what's confirmed about this.
- GUI — Sound Board, Clock & Alarm, Light Show, Sensors, Camera, TV Out
- System — Files, Setup & Actions, Power Management, Sleep, About
This list is read directly from the firmware's menu-building code
(fwPanelLibDisplay.cpp, loadMainMenu()). Four of the entries above — GPS,
USB Sim, RFID, and LORA — appear in that menu but have no panel registered
behind them (no matching addApp() call anywhere in the firmware for any of
the four — the function is named addApp() for historical reasons, but what
it registers is a panel), so selecting one currently does nothing; they're
marked above. Skelltris, Wili8, and Doom, meanwhile, all three map to the
same panel (the Wi-Li-nux Terminal) rather than launching the three distinct
apps they're named for.
A folder's row toggles it open or closed; open folders show their contents indented underneath. Selecting a panel inside a folder — or one of the top-level panels — opens it.
The top-level panels
Alongside the folders, five panels sit at the top of the main menu. Here's what each one actually is:
- Command Panel — a dashboard you build yourself: place LEDs, text displays, buttons, bar graphs, meters, and graphs on a blank canvas and wire each one to a signal from Wili Blocks. It's a control-panel builder, not a script runner in its own right.
- Scripts — lists the files sitting in the
/scripts/folder on the SD card and runs whichever one you pick. Which engine runs it depends on the file's extension — see Running apps for the three script types and how they differ from an app. Blue exits a running script early. - Wili Blocks — the viewer and runner for WiliBLOCKS automation:
.wilifiles built from sequences of numbered steps, point-and-click rather than text-based. You can have several running in parallel, and author them either on the device's own screen or in the FREE-WILi GUI desktop app. - App Data — a planned two-pane data browser. As of this writing most of its implementation is stubbed out, so treat it as not yet finished.
- Editor — a text/script editor. Right now it always opens the same fixed file rather than letting you pick one — the file picker that would let Editor open an arbitrary file is still pending.
Files, reached from the System folder rather than the top level, is the
one that's fully built: a two-pane file browser with rename, remove, copy,
and paste, and it can spot an ESP32 flashing job (a flasher_args.json file
next to the binary) and offer to run it directly.
Sub-panels within a panel
Some panels are more than one screen. The Analog IO panel is a good
example: its main screen lists the four analog input channels and two
analog output channels, and pressing center on one of the output rows
(o0 or o1) opens a second panel — the waveform generator — for that
channel. Ok leaves that sub-panel and returns you to the main panel.
Other multi-screen panels follow the same overall structure — a main panel
plus one or more sub-panels reached by selecting something on it — but which
button leaves a given sub-panel is up to that screen; check its on-screen
button labels rather than assuming Ok always does it (see the
button map above).
Built-in help
The device has its own on-screen help viewer.
Pressing Green on the main menu opens the general help topic — the same page published here as Home Screen, which also covers picking and authoring home-screen themes. On a panel that declares its own help topic, Cancel opens that topic instead of backing out — pressing Cancel there brings up that screen's help page directly on the device.
Not every panel has one yet. The mechanism is generic and panels opt in one at a time as their help pages get written, so the set grows between firmware releases; Analog IO and its waveform sub-panel are among the screens that have one. If Cancel backs you out instead of opening help, that screen simply doesn't have a page written for it yet.